When you have a large number of products on your WooCommerce store, you need to use different approaches to organize them. WooCommerce, by default, offers different grouping techniques or taxonomies such as categories, tags, attributes, etc. In this article, we will focus on WooCommerce attributes and how you can use them to make your products more accessible to customers.
WooCommerce Attributes
Attributes are a classification option in your WooCommerce store. It will help you group products by defining a bunch of attributes you want to use to group products together. Generally, attributes are used for two purposes.
- For product filters – You can display a widget on the sidebar of your store that allows customers to filter products by attributes. For example, ‘Color’ can be an attribute that you will commonly see in a lot of WooCommerce stores.
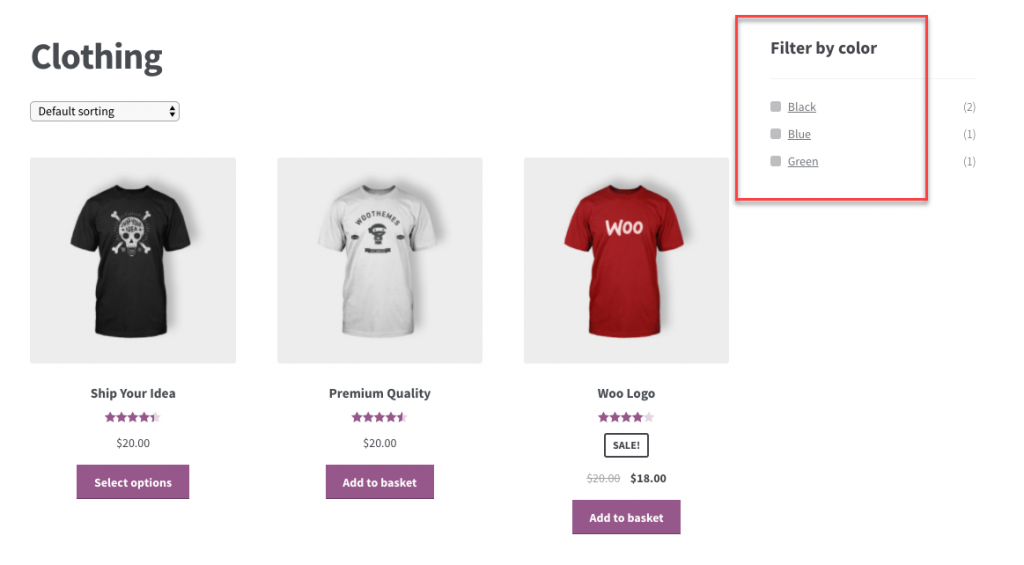
WooCommerce attributes will help you offer an option for customers to filter products. - To create variations – One of the more familiar use of WooCommerce attributes will be in their role to create variable products. The attributes and their available terms will help you in distinguishing variations for the same product. For example, ‘Blue’ and ‘Red’ could be terms of the attribute ‘Color’.
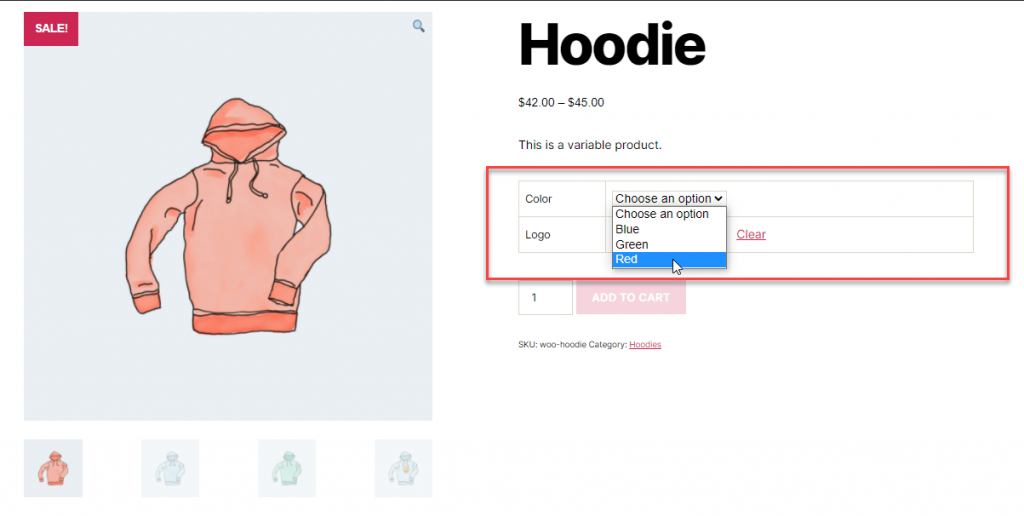
You can use WooCommerce attributes and their terms to create variable products.
Types of Attributes
You will find two types of attributes based on how you can use them. These are:
- Global attributes – These attributes will be accessible to all products in your store. Based on your product strategy, you can use it whenever needed.
- Custom attributes – These will be specific to a product. If a product has a unique attribute based on which you can distinguish it to different variations, you can use this.
How to create product attributes?
To create or edit attributes, on the WordPress admin panel, you can go to Products > Attributes. Here, you will see the existing attributes on the right, and fields to create new attributes on the left.

To edit an existing attribute, you can use the ‘Edit’ option that will be visible when you hover the cursor around the name of the attribute.
To create a new global attribute, you can fill the following following fields:
- Name – Set a name for the new global attribute you are creating.
- Slug – Slug is a unique reference for the name of the attribute that is more friendly to search engines. When you add a slug, remember to keep it below the character limit of 28.
- Enable archives – This is a checkbox that determines if the attribute will have its own page on your store. That is, if enabled you will be able to display all the products associated with this attribute on a single page. For example, you can display all items with value ‘red’ for attribute ‘color’ on a single page this way. Check out this documentation for more information.
- Default sort order – This option will determine what order the attribute terms are displayed on the frontend of your store. You will find four options:
- Custom ordering
- Name
- Name (numeric)
- Term (id)
Basically, these 4 options determine the order of display of attribute terms. If you choose ‘custom ordering’, you can drag and drop values to keep them in a custom order. By choosing ‘Name’, you can order them alphabetically. ‘Name (numeric)’ can be used to sort numerically, when the terms are numbers. ‘Term (id)’ will sort the terms based on their ids.

Adding attribute terms
You can create an attribute by clicking the ‘Add attribute’ button. Now the attribute will be created, but without values. The new attribute will be visible on the right side of the page. You can click the ‘Configure terms’ option to add values to this attribute.

For example, we have created an attribute ‘Material’. We will add the attribute terms, ‘Cotton’ and ‘Linen’ to it. For this, first we will click the option ‘Configure terms’. Then add the terms by specifying the Name, Slug and description for each.

Now, you will be able to assign these attribute values to relevant products.
For example, if you are selling cotton and linen apparel, you can assign them accordingly.
How to add a global attribute to a product?
To add an attribute to a product, go to the product detail page. In the Product data meta box, go to the Attributes section. Select the attribute you want to add from the dropdown. Then, specify the value that you want to add to the product.
You can also choose whether to make an attribute visible on the product page.

Note: If you delete an attribute term, it will be removed from the products and variations. And, when you recreate the term, you will have to add it manually to the products again as it won’t be automatically added.
Adding custom attributes to a product
To add a custom attribute to a product, you can select the option Custom product attribute’ from the dropdown, and create an attribute.
For example, we will add a custom attribute ‘Sleeve’ to this product ‘Long Sleeve Tee’. We will also add the attribute value ‘Full’.
In case, you want to add multiple attribute values, you can separate each by using ‘|’.

Variable products and variations
Variable products are a type of products in WooCommerce that will help you create different variations of the same product. You will be able to control the stock, price, image, etc., of a variation independently of other variations.
How to create a variable product and variations?
For example, we will create a new product, with variations based on size and color. Now, as you know, ‘Size’ and ‘Color’ could be the attributes with their own respective terms or values such Large, Medium, Blue, Red, etc. These are the steps:
- Go to Products > Add New.
- Enter a name and description for the product.
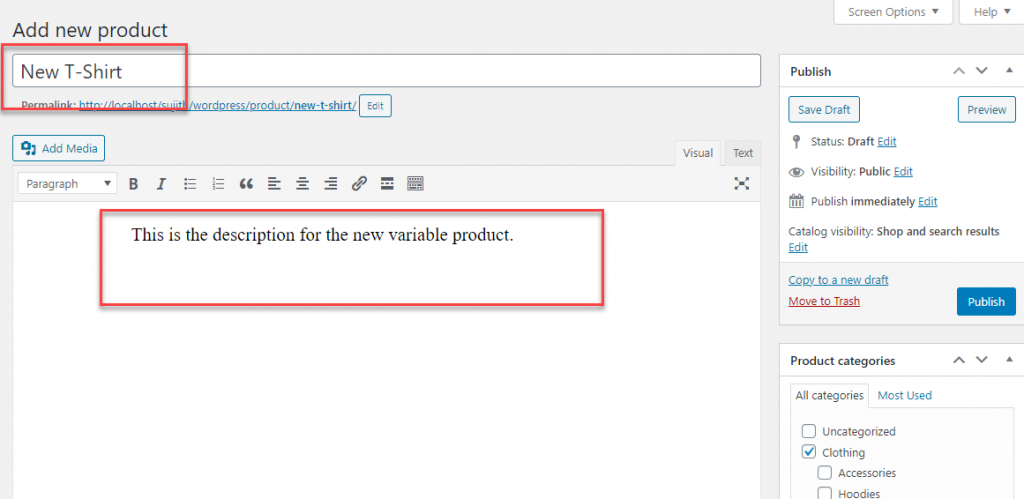
Start with the name and description for the product. - Select variable product from the product data meta box.
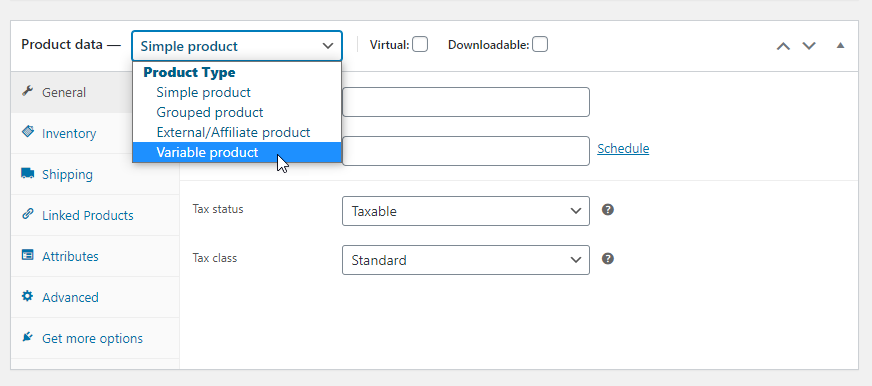
You can select variable product from the product data meta box dropdown. - Add attributes and values to the product. Here, you can also check the options to display the attributes on the product page and make it available for creating variations. One done, click the Save attributes button.
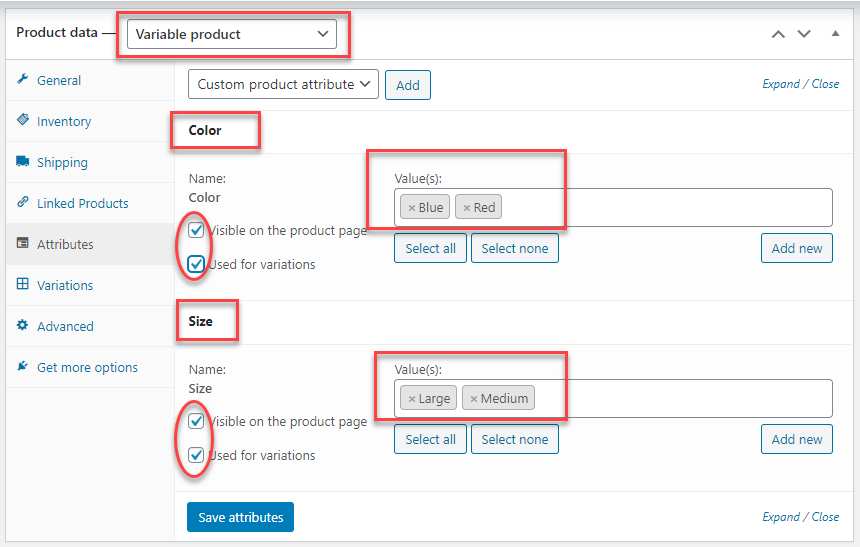
You need to specify the attributes before creating variations. - Now, you can go to the Variations section to create variations. Here there are two options:
- Create variations one by one – Here, you will be able to specify the attribute values by selecting them from the dropdown, and then create individual variations.
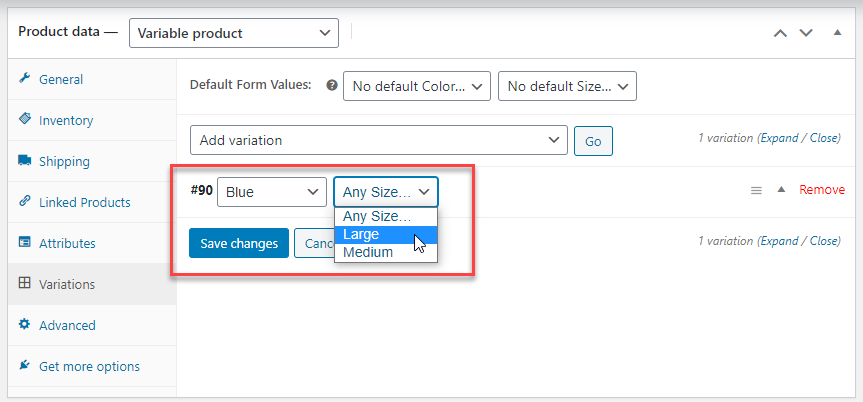
If using this option, you will have control over the variations. - Or, automatically create variations from all available attributes – If you have added only relevant attributes and values, you can create all the available variations at once. This will save you from creating each individual variations manually. Simply select the option ‘Create variations from all available attributes’, and click Go.
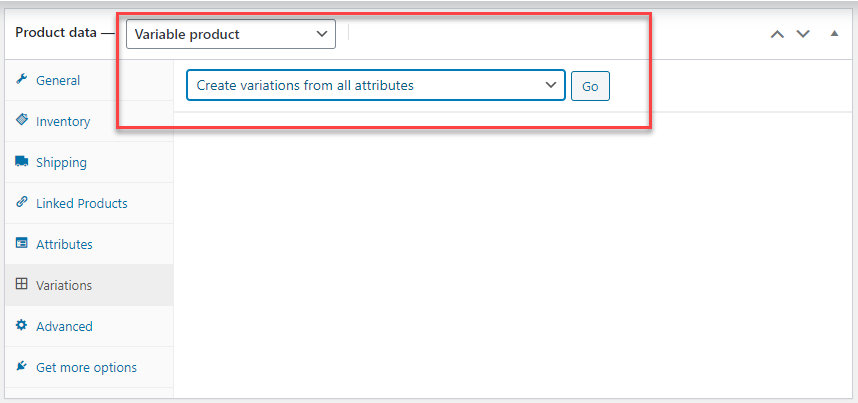
You can create variations easily this way. This will create all the possible variations at one go.
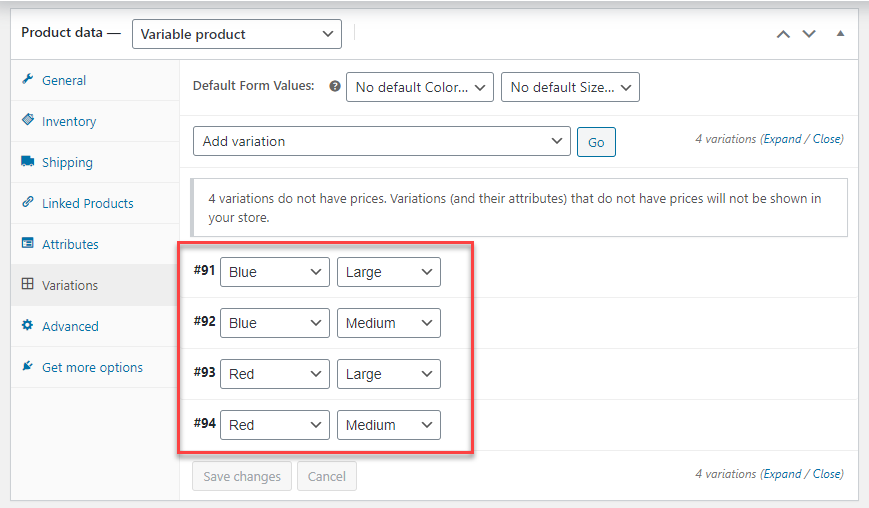
As expected, you can see all variations are created as per the attributes we have added to the product in the previous step.
- Create variations one by one – Here, you will be able to specify the attribute values by selecting them from the dropdown, and then create individual variations.
- Now, you can set price, stock and other aspects of each variation separately.
Editing individual variations
As discussed above, you will be able to independently control the stock, price, images, etc., of each variation. For this, you can access the individual variations and make the changes. Once all the variations are created, you will see the Variations section of the variable product as the below screenshot. All the available variations will be listed, and you can access the individual settings by clicking the small triangle that will be visible when you hover cursor around the variation.

Once you expand a variation, you can control the following aspects:
- Image – You can upload an image specific to the variation.
- SKU – You can add an SKU for the variation.
- Enable – Tick the checkbox to enable the variation.
- Regular Price – You need to enter a price for the variation.
- Sale Price – You can optionally add a Sale price
- Stock status – Specify whether the variation is in stock or out of stock.
- Weight and dimensions – Add the weight and dimensions for the variation.
- Shipping class – You can assign a shipping class to the variation. By default it will be ‘Same as parent’.
- Tax class – There is also an option to specify a tax class for the variation. Here too, the default option is ‘Same as parent’.
- Description – Optionally, you can add a description for the variation.

Product type specifications
- Downloadable – You can specify if the product is downloadable. If checked, additional fields will be added for the downloadable file upload as well as download limit and expiry.

2. Virtual – Specify if the variation is a virtual product.
Stock management
Manage Stock? – Check if you want to enter stock management options specific to the variations. When checked, you will see two more fields for stock quantity and to allow backorders.

Default variation to be displayed on the frontend
When the customer opens a variable product, should they see a specific variation or should they specify the attributes they are interested in and then open a variation? You can determine this in the Variations settings by adding a default variation to be displayed.

Bulk editing WooCommerce attributes and variations
By default, WooCommerce does not provide adequate options to bulk edit WooCommerce attributes and variations. You will be able to make changes to the parent product alone. However, this could be a challenge when you have a large number of variations for each variable product.
In such scenarios, you can use a product like ELEX WooCommerce Advanced Bulk Edit Products, Prices & Attributes to manage bulk edit operations more smoothly.
You will be able to filter products based on attributes and also apply bulk edit to individual variations. The plugin also helps you add new values or terms to your existing attributes and also interchange attribute values. For example, you can interchange ‘Blue’ color with ‘White’ if you have made such a change in your stock.

Displaying product attributes and variations on the frontend
As discussed above, attributes can help in frontend display in two ways. As a product filter option on the sidebar, and also to help the customer choose a desired variation.

However, if you want to display attribute values in the Shop page, you can manage it with the Products By Attributes & Variations for WooCommerce extension. This will help customers choose a desired variation from the Shop page itself.

In addition, this plugin also lets you display individual variations as a simple product. This could be helpful if you want to make your product catalog appear more rich. Also, you will be able to hide the display of the parent product.
For a variable product, WooCommerce offers by default offers a simple display option on the product page. The customer will have to select the term for each attribute and then open the variation. This can be further modified by the Variation Swatches and Photos plugin. With this plugin, you will be able to offer a visual interface to help customers choose the variations they want. For example, you can display the variation swatches in a creative manner.

Applying dynamic discounts based on attributes and variations
WooCommerce lets you easily set up pricing for individual variations. However, if you want to set price adjustments for specific attributes or variations, you have to get a plugin. With the help of ELEX WooCommerce Dynamic Pricing and Discounts Plugin, you can set up a discount for individual variations based on quantity, weight or price. Similarly, you can use this plugin to offer discounts to customers when adding specific attributes to the Cart. You can set it up so that the discount applies for a single attribute or multiple ones. Check this documentation for more details.

Adding multiple variations to cart together
As you have seen, a customer will be able to select a specific variation and add it to Cart. What if you want to give an option to add multiple variations to the Cart at the same time? You can use Bulk Variation Forms extension to allow customers to add multiple variations of the product from the same form. This could be a convenient option for wholesale stores.

Hopefully, this article has helped you gain a detailed perspective on WooCommerce attributes and variations. Leave us a comment if you have a query.


